I recently started an attempt at a generic personal SuperCollider timeline framework.
While this timeline is something I am currently only making for myself, I am documenting my process as a kind of tutorial, because people on the user forum have asked for more intermediate level tutorials. And because you run into all sorts of interesting problems trying to make a reliable timeline, and I'm finding it helpful for the quality of the code to document it in this way..
This installment will just involve making a very basic data structure for a "timeline" with some "tracks", each track has some "clips" with a start time and a duration. Then we will make a graphical interface to visualize the timeline, which we can scroll and zoom.
The way I usually get started with a project like this, I will represent the elements of the data structure, i.e. the timeline, tracks, and clips, as Events.
(
~timeline = (
  tracks: [
    (
      clips: [
        (startTime: 0.0, duration: 1.8),
        (startTime: 2.0, duration: 1.2),
        (startTime: 4.0, duration: 0.6)
      ]
    ),
    (
      clips: [
        (startTime: 1.0, duration: 1.3),
        (startTime: 3.0, duration: 1.7),
        (startTime: 5.0, duration: 0.8)
      ]
    )
  ]
);
)
This is a useful shorthand because it quickly allows us to see the gist of what we're going to be making, and reveals the parameters that we need to visualize. We can imagine there might be many more tracks and clips, of all kinds of durations, and they might represent things like Patterns, Synths, Routines, Functions, and Envelopes, that should start at a particular time and end at a particular time.
We can access the clip information in this way:
~timeline.tracks[0].clips[1].startTime // -> 2.0
which is useful because this syntax will seamlessly work with the classes we will make later.
• Just note that there are some keys you want to avoid using in this way (e.g. play, delta, next, synth, free, isRest, pause, resume, stop, split, are the more common ones) because they are instance methods of Event — so I feel a little hesitant to show this mockup here. But this in mind, I still use Events frequently to mock up a class structure, because it is so quick and flexible — and doesn't require a recompile to adjust.
By the way, we will consider the units of time to be "beats" — the timeline will play slower or faster depending on the tempo of the TempoClock upon which the timeline is played.
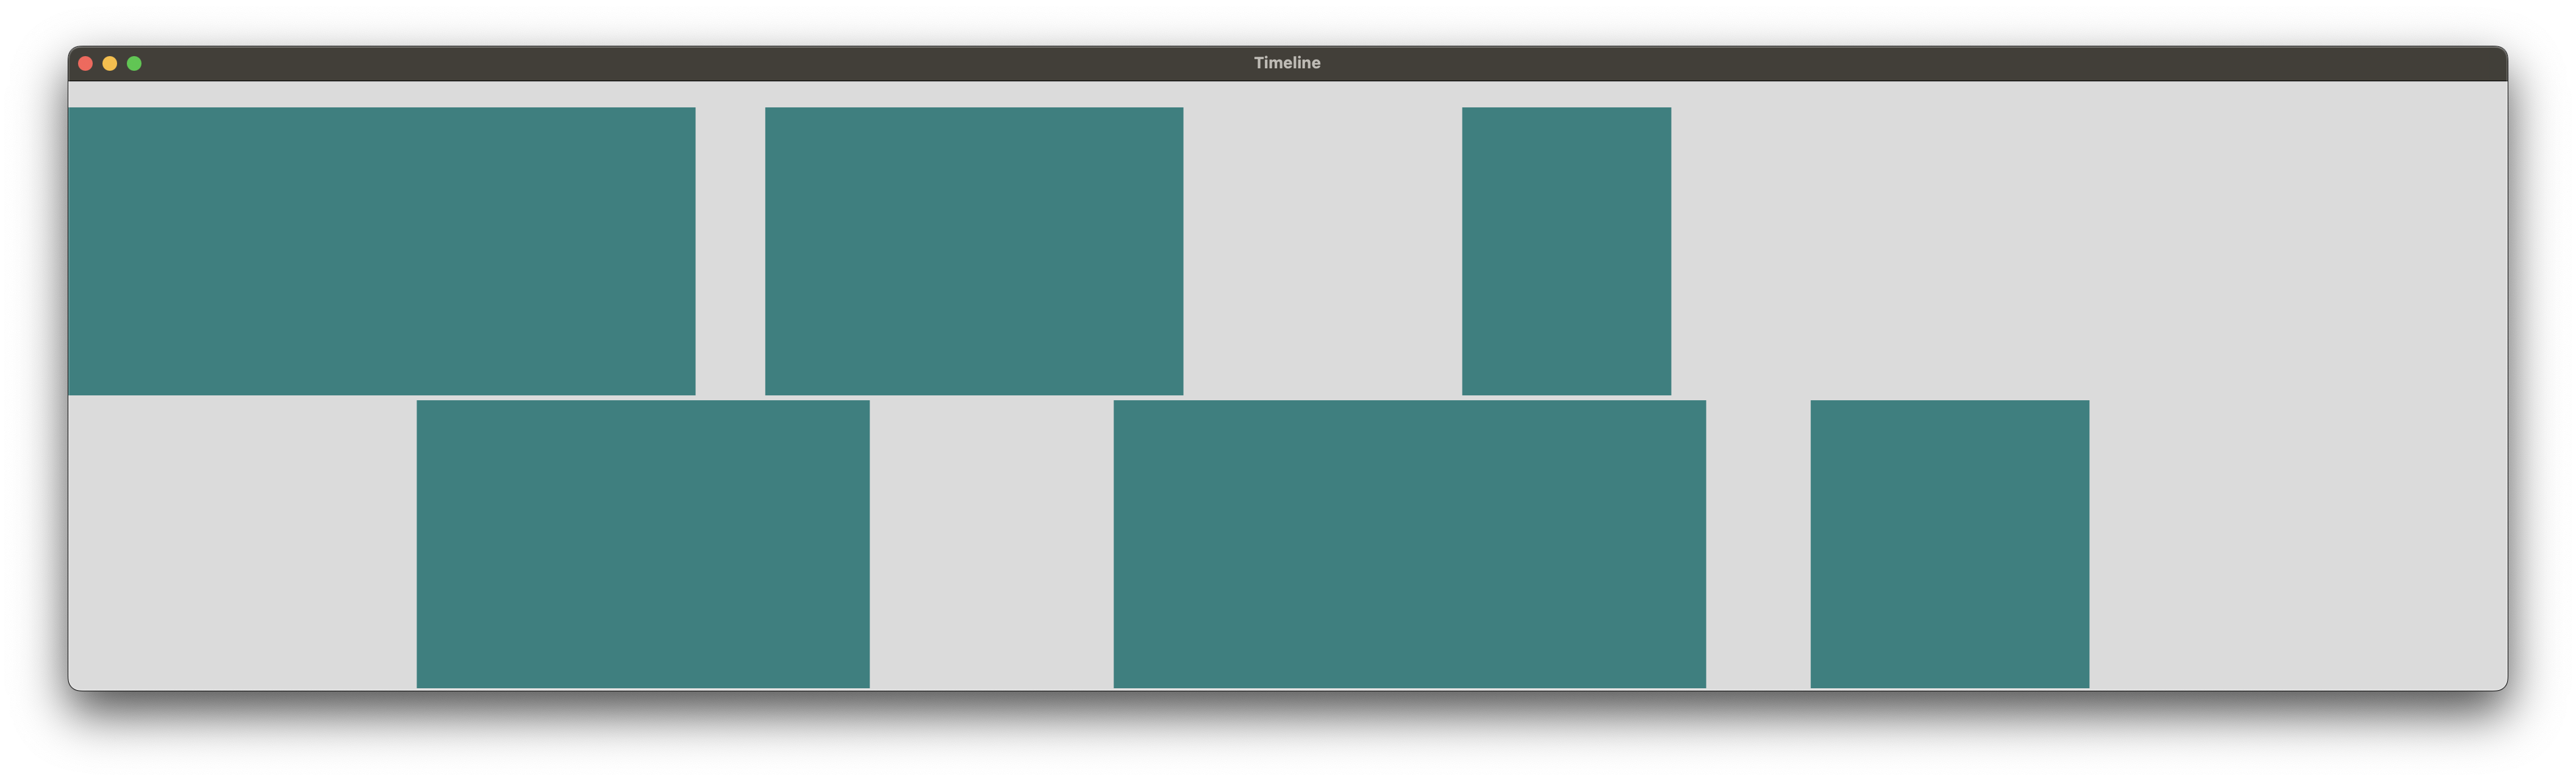
I will make a window that is 2000 pixels wide and 500 pixels tall. I will make a separate UserView for each track as a visual row upon which the clips are drawn using Pen.
The top portion of the view will eventually be our timeline ticks, which I think will take up 20 pixels of space. So the height of each track will be the total height minus 20, and then divided between the number of tracks in the timeline.
The startTime and duration here refers to the bounds of the visualization, so for example the window might begin at 20 beats and show you 9.5 beats.
I wrote some helper functions, relativeTimeToPixels (if two events are 2.8 beats apart, how many pixels is that?) and absoluteTimeToPixels (if an event begins 38 beats into the timeline, what pixel is that in the window?) which will probably keep coming in to play.
(
var window, timelineView, trackViews;

var width = 2000; // width of the window
var height = 500; // height of the window
var trackHeight = (height - 20) / ~timeline.tracks.size;

var startTime = 0.0; // start time in timeline
var duration = 7.0; // duration in timeline

// helper functions
var relativeTimeToPixels = { |time| (time / duration) * width };
var absoluteTimeToPixels = { |time| relativeTimeToPixels.(time - startTime) };

// close all windows and open a new window called "Timeline"
Window.closeAll;
window = Window("Timeline", Rect(0, 0, width, height)).front;

// entire window is a timeline view
timelineView = UserView(window, Rect(0, 0, width, height));

// each track is its own view on top of the timeline view
trackViews = ~timeline.tracks.collect { |track, i|
  var top = i * trackHeight + 20;
  UserView(timelineView, Rect(0, top, width, trackHeight))
  .drawFunc_({
    Pen.use {
      // draw a rectangle for each clip onto the track view:
      track.clips.do { |clip, j|
        var left = absoluteTimeToPixels.(clip.startTime);
        var width = relativeTimeToPixels.(clip.duration);
        Pen.color = Color.hsv(0.5, 0.5, 0.5);
        Pen.addRect(Rect(left, 2, width, trackHeight - 4));
        Pen.fill;
      };
    }
  });
};
)
• For more on GUI objects, see the Introduction to GUI Helpfile.
This is a really helpful mockup, because we can easily see the basic maneuvers needed to draw a visual representation of our timeline structure.
But, before we go any further with making this interactive or playable, now would be a good time to encapsulate what we have just done into classes.
Every object in SuperCollider is an instance of a Class. We can define our own classes to encapsulate long-winded behavior like the visualization code above into our own custom objects.
• For more on classes, check out the Writing Classes Helpfile or Eli Fieldsteel's Classes and Methods tutorial.
I usually save each class in its own file. You need to save classes in files ending with .sc (not .scd) somewhere in your Extensions folder, which is in your user support directory — File > Open user support directory, then navigate to Extensions folder (or create it if it doesn't exist) and make a new folder for this project, I called mine ESTimeline.
I will start with the simplest classes possible, just to demonstrate the mechanics of making a new class:
It is not recommended to name your classes something generic like Clip because it could clash with some quark or other extension you have installed. To avoid this I prefix all of my new classes with my initials, ES.
I save this as a new text file, ESClip.sc, in the project folder I just made.
/* ESClip.sc */

ESClip {
  var <startTime, <duration;

  *new { |startTime, duration|
    ^super.newCopyArgs(startTime, duration);
  }
}
Now this will do just the same thing as our previous clip Event in the data structure: it will contain the information about a clip's start time and duration.
I am using the convenience method Object.newCopyArgs to put the arguments into the instance variables I have just defined. (Object is the implicit superclass of any class without an explicit superclass).
• note that you can only use .newCopyArgs if your class does not explicitly subclass any other class, or none of the superclasses have any instance variables.
The next two parts of the data structure are very similar:
/* ESTrack.sc */

ESTrack {
  var <clips;

  *new { |clips|
    ^super.newCopyArgs(clips);
  }
}
/* ESTimeline.sc */

ESTimeline {
  var <tracks;

  *new { |tracks|
    ^super.newCopyArgs(tracks);
  }
}
Once you have saved all three new class files in your Extensions directory, go to Language > Recompile Class Library (or type Shift-command-L on a Mac or Shift-control-L on PC)
...and now here is our same timeline structure using our new classes:
(
~timeline = ESTimeline(
  tracks: [
    ESTrack(
      clips: [
        ESClip(startTime: 0.0, duration: 1.8),
        ESClip(startTime: 2.0, duration: 1.2),
        ESClip(startTime: 4.0, duration: 0.6)
      ]
    ),
    ESTrack(
      clips: [
        ESClip(startTime: 1.0, duration: 1.3),
        ESClip(startTime: 3.0, duration: 1.7),
        ESClip(startTime: 5.0, duration: 0.8)
      ]
    )
  ]
);
)
which could now be condensed if we don't explicitly show the names of the arguments:
(
~timeline = ESTimeline([
  ESTrack([
    ESClip(0.0, 1.8),
    ESClip(2.0, 1.2),
    ESClip(4.0, 0.6)
  ]),
  ESTrack([
    ESClip(1.0, 1.3),
    ESClip(3.0, 1.7),
    ESClip(5.0, 0.8)
  ])
]);
)
Our visualization code from above should still work as-is; you can use it to check that the classes you made work as expected. Now let's make some classes to encapsulate the visualization.
We are going to make two new classes, one for the overall timeline view, and one for each track, which will sit on top of the timeline view.
Here we call UserView's new function to create a new object, and then call our class's init function to populate our timeline variable and create our track views.
/* ESTimelineView.sc */

ESTimelineView : UserView {
  var <timeline;
  var <trackViews;
  var <startTime = -2.0;
  var <duration = 50.0;
  var <trackHeight;

  *new { |parent, bounds, timeline|
    ^super.new(parent, bounds).init(timeline);
  }

  init { |argtimeline|
    var width = this.bounds.width;
    var height = this.bounds.height - 20;

    timeline = argtimeline;
    trackHeight = height / timeline.tracks.size;

    trackViews = timeline.tracks.collect { |track, i|
      var top = i * trackHeight + 20;
      ESTrackView(this, Rect(0, top, width, trackHeight), track)
    };
  }

  // helper functions have become helper methods:
  relativeTimeToPixels { |time| ^(time / duration) * this.bounds.width }
  absoluteTimeToPixels { |clipStartTime| ^this.relativeTimeToPixels(clipStartTime - startTime) }
}
Now of course we need our track view class. Here it is:
/* ESTrackView.sc */

ESTrackView : UserView {
  var <track;

  *new { |parent, bounds, track|
    ^super.new(parent, bounds).init(track);
  }

  init { |argtrack|
    var timelineView = this.parent;
    track = argtrack;

    this.drawFunc_({ |view|
      Pen.use {
        track.clips.do { |clip, j|
          var left = timelineView.absoluteTimeToPixels(clip.startTime);
          var width = timelineView.relativeTimeToPixels(clip.duration);
          Pen.color = Color.hsv(0.5, 0.5, 0.5);
          Pen.addRect(Rect(left, 2, width, this.bounds.height - 4));
          Pen.fill;
        };
      }
    });
  }
}
Notice how we have now encapsulated most of our visualization code from above into these classes. So now, after we recompile (this will be a common theme — I recommend memorizing the key Shift-cmd/ctrl-L), the visualization code we need to run has much simplified:
(
var width = 2000;
var height = 500;
Window.closeAll;
~window = Window("Timeline", Rect(0, 0, width, height)).front;
~view = ESTimelineView(~window, Rect(0, 0, width, height), ~timeline);
)
With the < symbols next to the variables in our class definition, we have enabled reading of our view's start time and duration variables, but not writing:
(see defining instance variable accessor methods and calling an instance variable setter method in the Syntax Shortcuts Helpfile)
~view.startTime            // -> 0.0

~view.startTime = 2.0      // -> error
To write these values, we need to add "setter" methods to our class definition that both update the variables and refresh the view:
/* ESTimelineView.sc */

  startTime_ { |val|
    startTime = val;
    this.refresh;
  }

  duration_ { |val|
    duration = val;
    this.refresh;
  }
So now, once you recompile, you can evaluate e.g.
~view.startTime = 2;
~view.duration = 10;
and see the view update accordingly.
Now to accomplish this with mouse interaction. First we are going to tell our track views not to respond to any mouse events and therefore to pass all mouse interaction down to the timeline view. Add this to the track view init method:
/* ESTrackView.sc */

  init { |argtrack|
    ...

    this.acceptsMouse_(false);
  }
Recompile, and now we can interactively build the scroll wheel function. (See Mouse actions in the View Helpfile)
(
~view.mouseWheelAction = { |view, x, y, modifiers, xDelta, yDelta|
  [xDelta, yDelta].postln;
};
)
Run this and watch the post window while using the scroll wheel on the timeline view. (I am using a laptop with a 2 dimensional trackpad, so I get movement both left/right and up/down.) I'm going to start by building left/right scrolling behavior:
(
~view.mouseWheelAction = { |view, x, y, modifiers, xDelta, yDelta|
  view.startTime = view.startTime + (xDelta * -0.05);
};
)
For me this gives a natural feeling left-right scroll. If yours feels like it's scrolling the wrong way, make it a positive 0.05 instead. And adjust the size of this scaling factor to taste (bigger number scrolls faster). If your mouse does not feature left-right scrolling, don't worry, we will add a different scrolling method later.
Now I will comment the left/right scrolling temporarily so I can work on making an up/down scroll zoom in and out on the timeline view.
(
~view.mouseWheelAction = { |view, x, y, modifiers, xDelta, yDelta|
  //view.startTime = view.startTime + (xDelta * -0.05);
  view.duration = view.duration * yDelta.linexp(-100, 100, 0.5, 2, nil);
};
)
This scaling feels natural to me, you can adjust the scaling to taste with the linexp parameters. But there is a problem, which is that I would really prefer if it zoomed around the mouse cursor, instead of around the start position. To achieve this, it is first important to know what time position the mouse is at. So we need to add the inverse of our previous "timeToPixels" helper functions to our timeline view class:
/* TimelineView.sc */

  pixelsToRelativeTime { |pixels| ^(pixels / this.bounds.width) * duration }
  pixelsToAbsoluteTime { |pixels| ^this.pixelsToRelativeTime(pixels) + startTime }
Recompile, and then we can adjust our zooming function so that it updates the startTime after each zoom to keep the mouse position representing the same time point:
(
~view.mouseWheelAction = { |view, x, y, modifiers, xDelta, yDelta|
  //view.startTime = view.startTime + (xDelta * -0.05);
  var xTime = view.pixelsToAbsoluteTime(x);
  view.duration = view.duration * yDelta.linexp(-100, 100, 0.5, 2, nil);
  view.startTime = xTime - view.pixelsToRelativeTime(x);
};
)
Finally, we can add our left/right scrolling code back, now scaling it by the view's duration (i.e. zoom level) so that the scrolling feels consistent across zoom levels:
(
~view.mouseWheelAction = { |view, x, y, modifiers, xDelta, yDelta|
  var xTime = view.pixelsToAbsoluteTime(x);
  view.duration = view.duration * yDelta.linexp(-100, 100, 0.5, 2, nil);
  view.startTime = xTime - view.pixelsToRelativeTime(x);
  view.startTime = view.startTime + (xDelta * view.duration * -0.002);
};
)
...and now we add this to our timeline view class. In the init method, add:
/* ESTimelineView.sc */

  init { |argtimeline|
    ...

    this.mouseWheelAction = { |view, x, y, modifiers, xDelta, yDelta|
      var xTime = view.pixelsToAbsoluteTime(x);
      view.duration = view.duration * yDelta.linexp(-100, 100, 0.5, 2, nil);
      view.startTime = xTime - view.pixelsToRelativeTime(x);
      view.startTime = view.startTime + (xDelta * view.duration * -0.002);
    };
  }
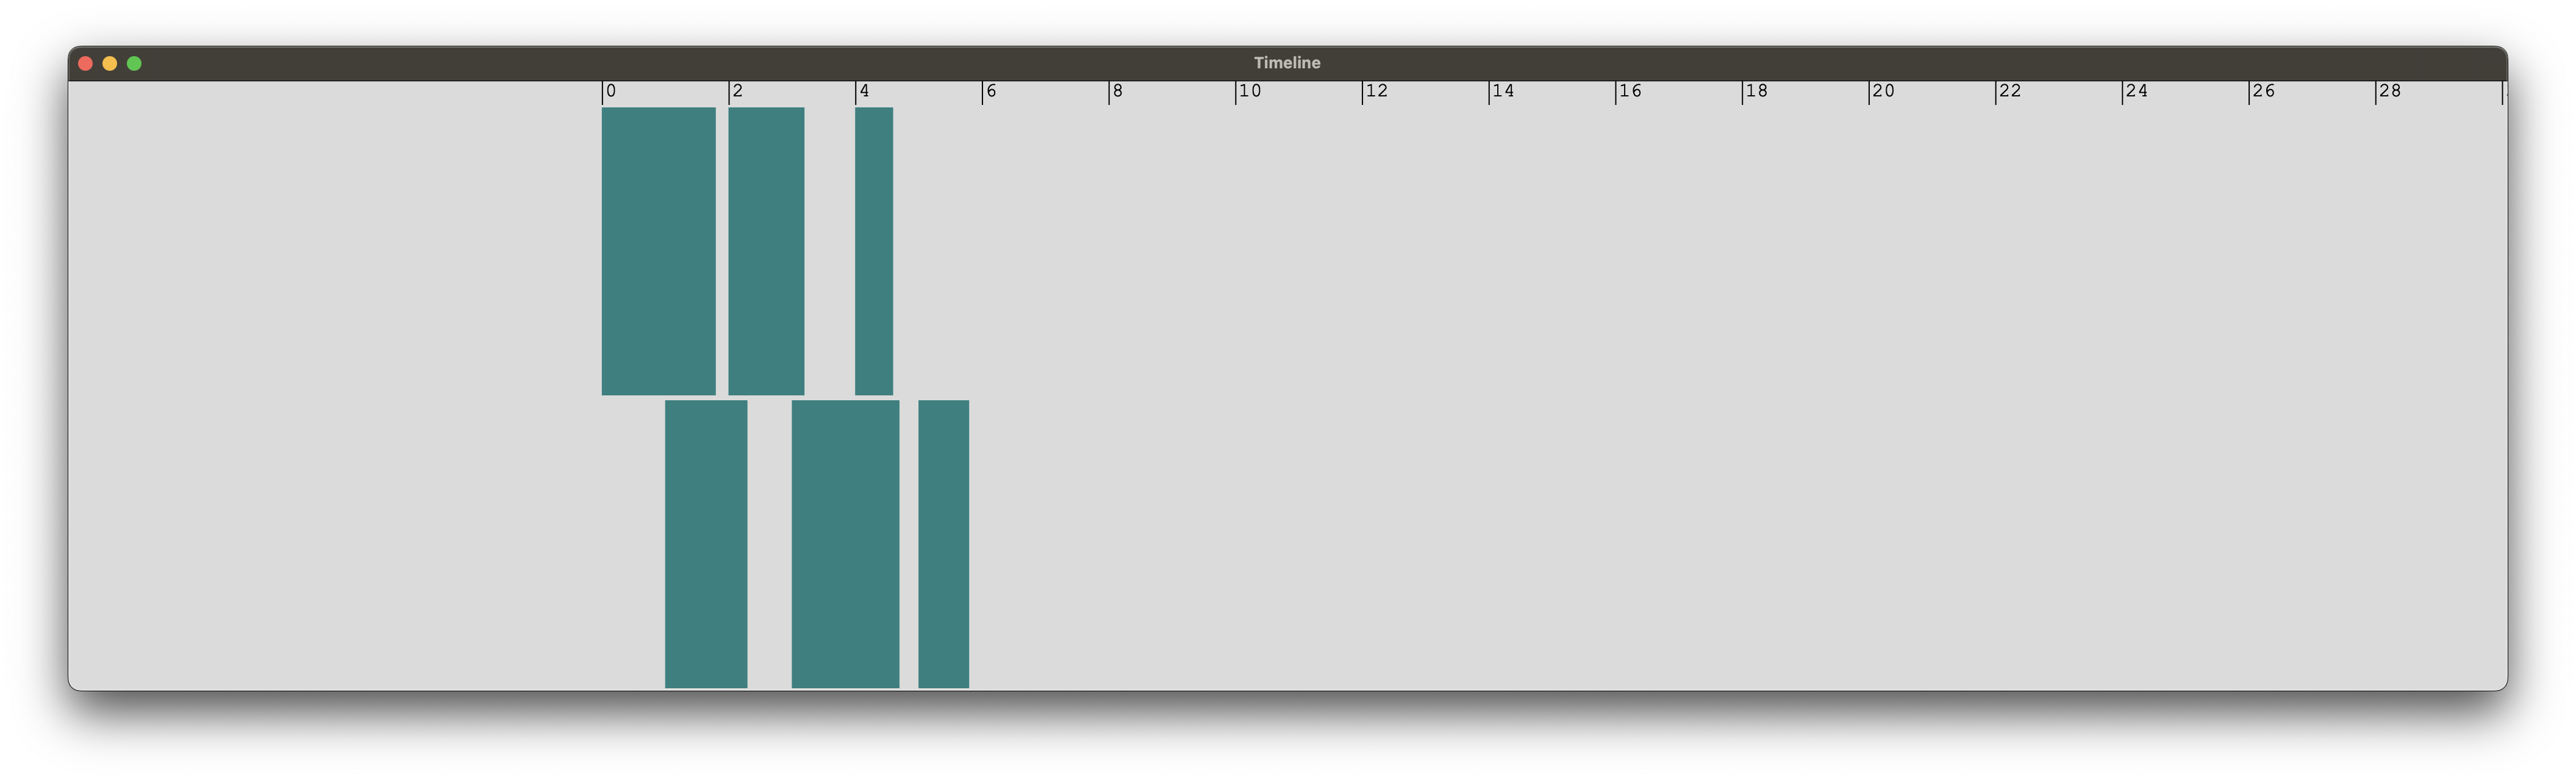
I will add tick marks with beat numbers in that 20 pixel top margin of the timeline view by writing a drawFunc for it:
(
~view.drawFunc = {
  Pen.use {
    Pen.color = Color.black;
    (~view.startTime + ~view.duration + 1).asInteger.do { |i|
      var left = ~view.absoluteTimeToPixels(i);
      Pen.addRect(Rect(left, 0, 1, 20));
      Pen.fill;
      Pen.stringAtPoint(i.asString, (left + 3)@0, Font("Courier New", 16));
    };
  };
};
)
This shows us beat markers that respond appropriately to scrolling and zooming, except that when you zoom out too far, they become too dense and unreadable. So, for better scaling, we can calculate a "division" (i.e. division of 1 will show every tick mark, division of 2 will show every second tick mark, etc) that will give us at least 60 pixels of visual space around each tick mark:
(
~view.drawFunc = {
  var division = (60 / (~view.bounds.width / ~view.duration)).ceil;
  Pen.use {
    Pen.color = Color.black;
    (~view.startTime + ~view.duration + 1).asInteger.do { |i|
      if (i % division == 0) {
        var left = ~view.absoluteTimeToPixels(i);
        Pen.addRect(Rect(left, 0, 1, 20));
        Pen.fill;
        Pen.stringAtPoint(i.asString, (left + 3)@0, Font("Courier New", 16));
      }
    };
  };
};
)
And to visualize the time units as beats within a 4/4 time signature:
(
~view.drawFunc = {
  var division = (60 / (~view.bounds.width / ~view.duration)).ceil.round(4);
  Pen.use {
    Pen.color = Color.black;
    (~view.startTime + ~view.duration + 1).asInteger.do { |i|
      if (i % division == 0) {
        var left = ~view.absoluteTimeToPixels(i);
        Pen.addRect(Rect(left, 0, 1, 20));
        Pen.fill;
        if (i % 4 == 0) {
          Pen.stringAtPoint((i / 4).asInteger.asString, (left + 3)@0, Font("Courier New", 16));
        };
      }
    };
  };
};
)
For now I'm not going to use a time signature, so I'll add to my timeline view class init function:
/* ESTimelineView.sc */

  init { |argtimeline|
    ...

    this.drawFunc = {
      var division = (60 / (this.bounds.width / this.duration)).ceil;
      Pen.use {
        Pen.color = Color.black;
        (this.startTime + this.duration + 1).asInteger.do { |i|
          if (i % division == 0) {
            var left = this.absoluteTimeToPixels(i);
            Pen.addRect(Rect(left, 0, 1, 20));
            Pen.fill;
            Pen.stringAtPoint(i.asString, (left + 3)@0, Font("Courier New", 16));
          }
        };
      };
    };
  }
The last thing I want to do with this part is to make the timeline move when I click and drag on the ticks area.
For this we need to keep track of a few more variables, so add to the top of the timeline view class:
/* ESTimeline.sc */

var clickPoint, clickTime, scrolling = false, originalDuration;
... and then add some mouse actions into the init class.
/* ESTimeline.sc */

  init { |argtimeline|
    ...

    this.mouseDownAction = { |view, x, y, mods|
      clickPoint = x@y;
      clickTime = this.pixelsToAbsoluteTime(x);
      originalDuration = duration;

      if (y < 20) { scrolling = true } { scrolling = false };
    };

    this.mouseUpAction = { |view, x, y, mods|
      clickPoint = nil;
      clickTime = nil;
      scrolling = false;
      originalDuration = nil;
      this.refresh;
    };

    this.mouseMoveAction = { |view, x, y, mods|
      if (scrolling) {
        var yDelta = y - clickPoint.y;
        var xDelta = x - clickPoint.x;
        if (mods.isAlt) { // hold option to zoom in opposite direction
          yDelta = yDelta.neg;
        };
        duration = (originalDuration * yDelta.linexp(-100, 100, 0.5, 2, nil));
        startTime = (clickTime - this.pixelsToRelativeTime(clickPoint.x));
        startTime = (xDelta.linlin(0, this.bounds.width, startTime, startTime - duration, nil));
        this.refresh;
      };
    };
  }
I'm not going to explain this in detail but it's quite similar logic from our scroll wheel behavior, I'll leave it as an exercise to deconstruct the additional logic.
I hope this has been enjoyable so far, and useful.
You can download my final classes from this installment here, unzip them and place them in your Extensions folder as described above.
Here is a little demonstration with thousands of clips with randomized durations:
(
~timeline = ESTimeline(
  tracks: [
    ESTrack(
      clips: 1000.collect { |i|
        ESClip(i, rrand(0.65, 0.95))
      };
    ),
    ESTrack(
      clips: 1000.collect { |i|
        ESClip(i + 0.5, rrand(0.2, 0.6))
      }
    ),
    ESTrack(
      clips: 666.collect { |i|
        ESClip(i * 1.5, rrand(0.8, 1.4))
      }
    )
  ]
);
)

(
var width = 2000;
var height = 500;
Window.closeAll;
~window = Window("Timeline", Rect(0, 0, width, height)).front;
~view = ESTimelineView(~window, Rect(0, 0, width, height), ~timeline);
)
On to the next part, where we start making sound!